This section provides step by step instructions on how to set up and start using BytebeamArduino

This guide assumes that you are using ESP32 development board for this integration and the same instructions will work for ESP8266.

Step 1. Getting the SDK

You can install the SDK via Arduino Library Manager. We recommend installing the latest version of the SDK for this integration. Follow the below steps to install the SDK

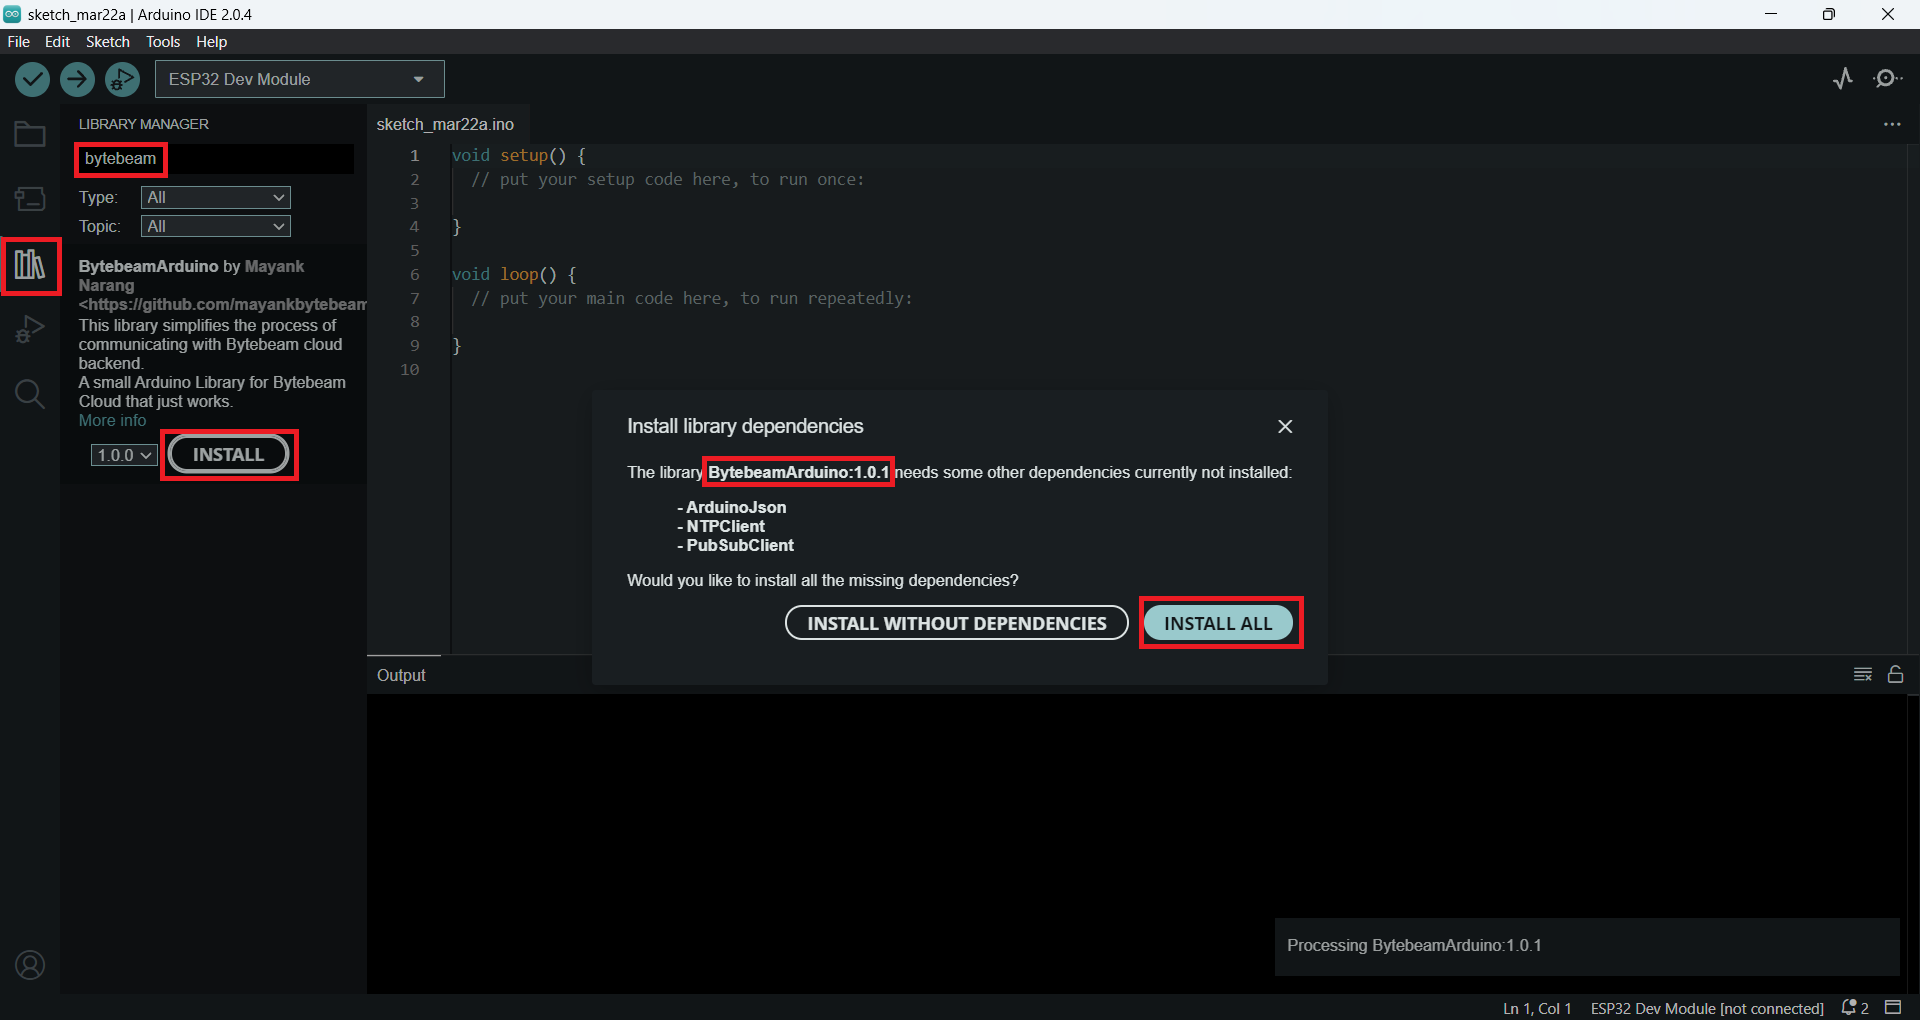
Open the Arduino Library Manager and search for the bytebeam keyword. The BytebeamArduino SDK will pop up. Go ahead select the latest version (say 1.0.1) and hit the install button.
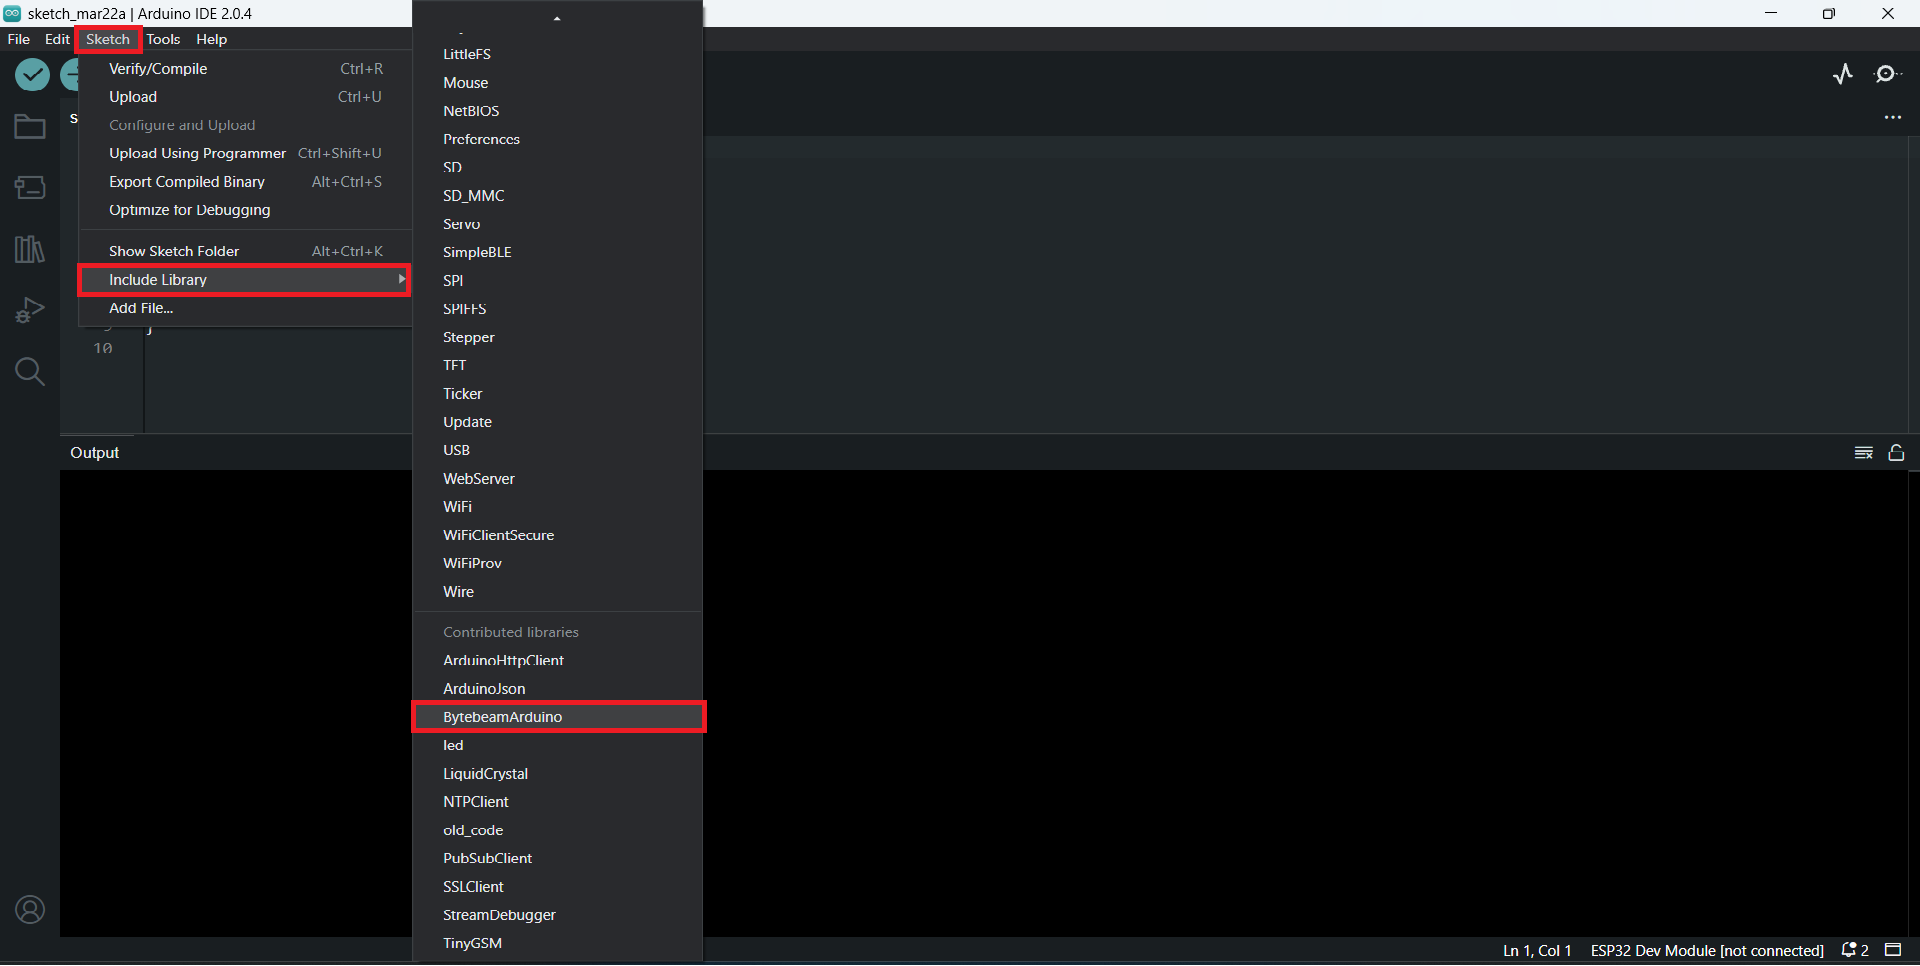
Now you should be able to see the SDK in the Arduino IDE. See Sketch > Include Library > BytebeamArduino within the Arduino IDE.

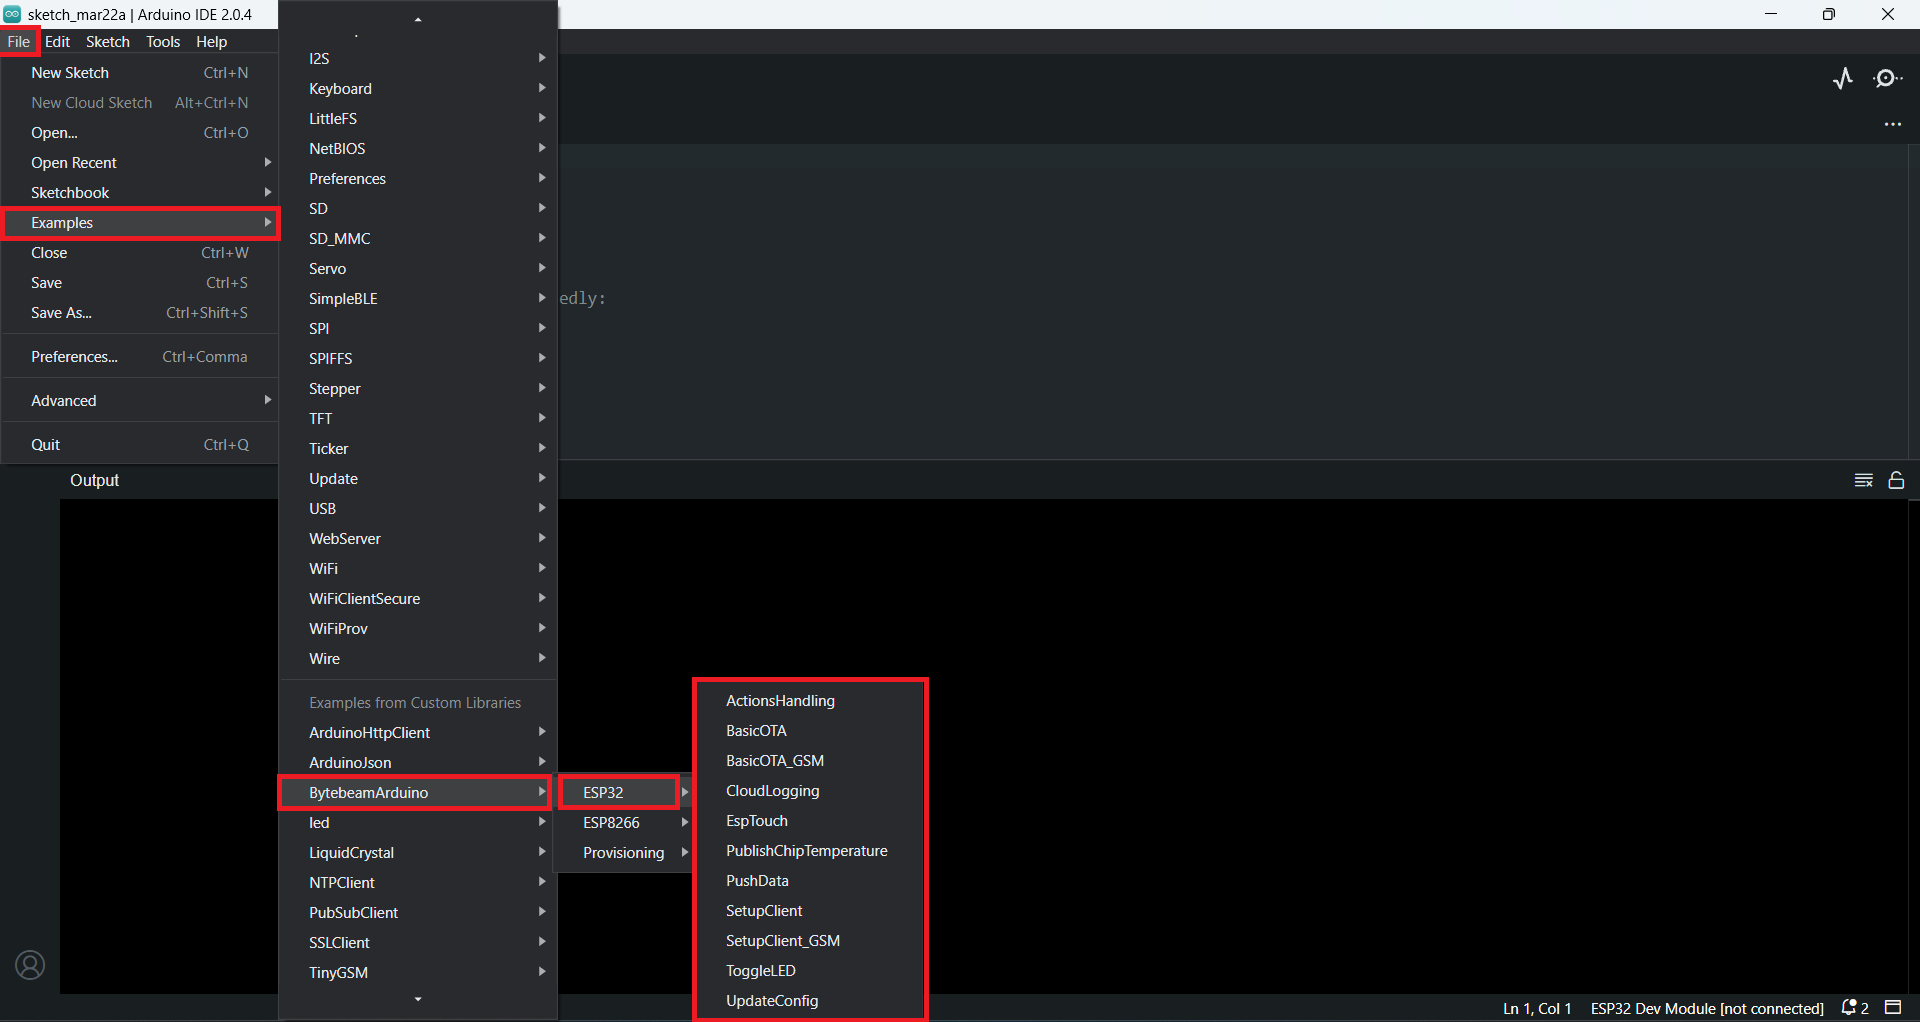
You can also look for example sketches that comes along with the SDK. See File > Examples > BytebeamArduino within the Arduino IDE.

Step 2. Device Provisioning

Provision device with device config data

Before you get started with the BytebeamArduino you need to provision your device. Each device has its own config file which needs to be flashed into its file system. When you call the begin method our SDK will look for this device config data and use that in order to establish the secure connection with the remote device at the cloud end.

For this integration we will go with the default configurations. If you want to change the configuration, check out the Advanced SDK Configurations guide.

Note: On ESP32 we use SPIFFS by default but if you are using ESP8266 you should use LITTLEFS by default

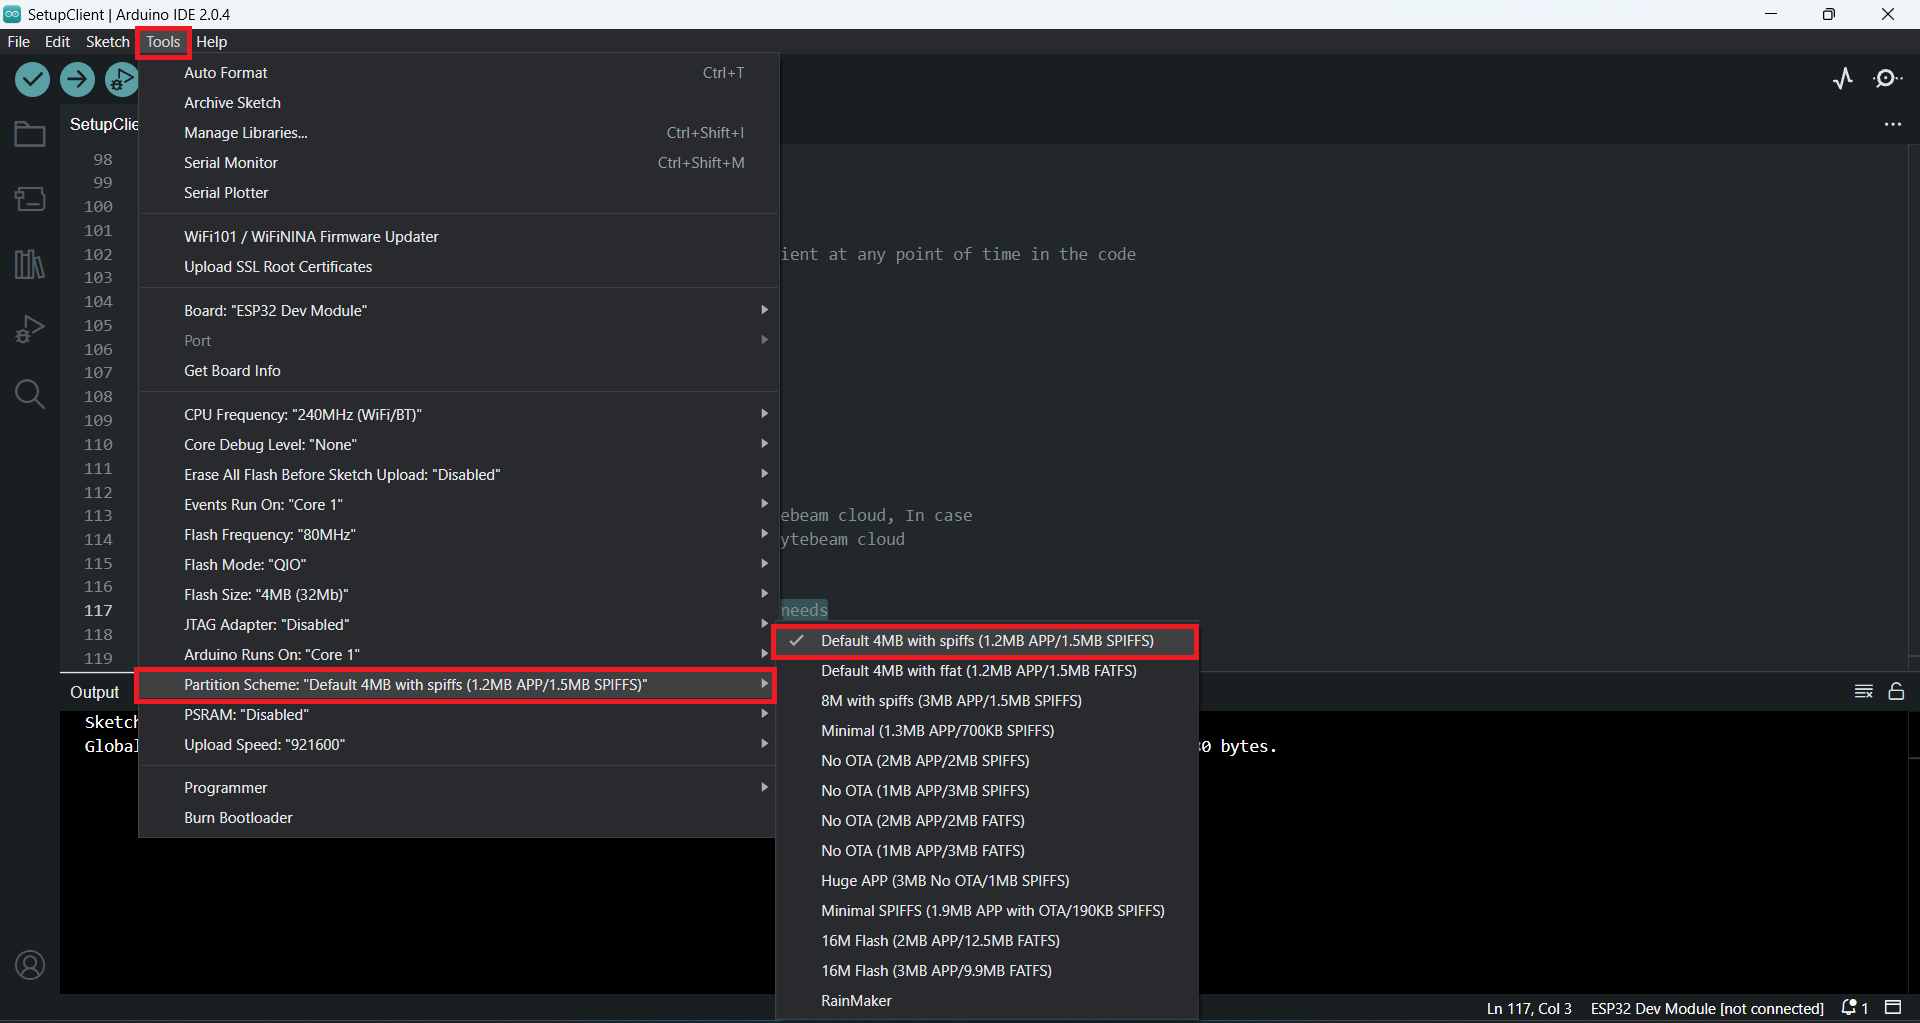
Before getting ahead make sure you have the SPIFFS file system partition. For this you can select the partition table setting under Tools section. See Tools > Partition Scheme within the Arduino IDE.
Follow the below steps to provision your device:

  1. Download the device configuration JSON file from Bytebeam cloud by following the Provisioning a Device guide.
  2. After downloading the config file, open it in your favourite text editor and format the json document. Once done copy the formatted json document to the clipboard.
  3. Open SPIFFS Provisioning example sketch as per your choice of file system. See File > Examples > BytebeamArduino > Provisioning > SPIFFSProvisioning within the Arduino IDE.
  4. Paste the copied content to the deviceConfigWriteStr char array, Refer below code snippet to do so.
  5. Setup the ESP32 board configurations and Hit the Upload button.
  6. Watch out the Serial logs for the provisioning status.
char deviceConfigWriteStr[DEVICE_CONFIG_STR_LENGTH] = R"(
{
    "project_id": "espbytebeamsdktest",
    "broker": "cloud.bytebeam.io",
    "port": 8883,
    "device_id": "1",
    "authentication": {
        "ca_certificate": "-----BEGIN CERTIFICATE-----\nMIIFrDCCA5SgAwIBAgICB+\naWExETAPBgNVBAgTCEthcm5hdGFrMRIwEAYDVQQHEwlCYW5nYWxvcmUxFzAVBgNV\nBAkTDlN1YmJpYWggR2FyZGVuMQ8wDQYDVQQREwY1NjAwMTExFDASBgNVBAoTC0J5\ndGViZWFtLmlvMB4XDTIxMDkwMjExMDYyM1oXDTMxMDkwMjExMDYyM1owdzEOMAwG\nA1UEBhMFSW5kaWExETAPBgNVBAgTCEthcm5hdGFrMRIwEAYDVQQHEwlCYW5nYWxv\ncmUxFzAVBgNVBAkTDlN1YmJpYWggR2FyZGVuMQ8wDQYDVQQREwY1NjAwMTExFDAS\nBgNVBAoTC0J5dGViZWFtLmlvMIICIjANBgkqhkiG9w0BAQEFAAOCAg8AMIICCgKC\nAgEAr/bnOa/8AUGZmd/s+7rejuROgeLqqU9X15KKfKOBqcoMyXsSO65UEwpzadpw\nMl7GDCdHqFTymqdnAnbhgaT1PoIFhOG64y7UiNgiWmbh0XJj8G6oLrW9rQ1gug1Q\n/D7x2fUnza71aixiwEL+KsIFYIdDuzmoRD3rSer/bKOcGGs0WfB54KqIVVZ1DwsU\nk1wx5ExsKo7gAdXMAbdHRI2Szmn5MsZwGL6V0LfsKLE8ms2qlZe50oo2woLNN6XP\nRfRL4bwwkdsCqXWkkt4eUSNDq9hJsuINHdhO3GUieLsKLJGWJ0lq6si74t75rIKb\nvvsFEQ9mnAVS+iuUUsSjHPJIMnn/J64Nmgl/R/8FP5TUgUrHvHXKQkJ9h/a7+3tS\nlV2KMsFksXaFrGEByGIJ7yR4qu9hx5MXf8pf8EGEwOW/H3CdWcC2MvJ11PVpceUJ\neDVwE7B4gPM9Kx02RNwvUMH2FmYqkXX2DrrHQGQuq+6VRoN3rEdmGPqnONJEPeOw\nZzcGDVXKWZtd7UCbcZKdn0RYmVtI/OB5OW8IRoXFYgGB3IWP796dsXIwbJSqRb9m\nylICGOceQy3VR+8+BHkQLj5/ZKTe+AA3Ktk9UADvxRiWKGcejSA/LvyT8qzz0dqn\nGtcHYJuhJ/XpkHtB0PykB5WtxFjx3G/osbZfrNflcQZ9h1MCAwEAAaNCMEAwDgYD\nVR0PAQH/BAQDAgKEMA8GA1UdEwEB/wQFMAMBAf8wHQYDVR0OBBYEFKl/MTbLrZ0g\nurneOmAfBHO+LHz+MA0GCSqGSIb3DQEBCwUAA4ICAQAlus/uKic5sgo1d2hBJ0Ak\ns1XJsA2jz+OEdshQHmCCmzFir3IRSuVRmDBaBGlJDHCELqYxKn6dl/sKGwoqoAQ5\nOeR2sey3Nmdyw2k2JTDx58HnApZKAVir7BDxbIbbHmfhJk4ljeUBbertNXWbRHVr\ncs4XBNwXvX+noZjQzmXXK89YBsV2DCrGRAUeZ4hQEqV7XC0VKmlzEmfkr1nibDr5\nqwbI+7QWIAnkHggYi27lL2UTHpbsy9AnlrRMe73upiuLO7TvkwYC4TyDaoQ2ZRpG\nHY+mxXLdftoMv/ZvmyjOPYeTRQbfPqoRqcM6XOPXwSw9B6YddwmnkI7ohNOvAVfD\nwGptUc5OodgFQc3waRljX1q2lawZCTh58IUf32CRtOEL2RIz4VpUrNF/0E2vts1f\npO7V1vY2Qin998Nwqkxdsll0GLtEEE9hUyvk1F8U+fgjJ3Rjn4BxnCN4oCrdJOMa\nJCaysaHV7EEIMqrYP4jH6RzQzOXLd0m9NaL8A/Y9z2a96fwpZZU/fEEOH71t3Eo3\nV/CKlysiALMtsHfZDwHNpa6g0NQNGN5IRl/w1TS1izzjzgWhR6r8wX8OPLRzhNRz\n2HDbTXGYsem0ihC0B8uzujOhTHcBwsfxZUMpGjg8iycJlfpPDWBdw8qrGu8LeNux\na0cIevjvYAtVysoXInV0kg==\n-----END CERTIFICATE-----\n",
        "device_certificate": "-----BEGIN CERTIFICATE-----\nMIIEcjCCAlqgAwIBAgICB+\naWExETAPBgNVBAgTCEthcm5hdGFrMRIwEAYDVQQHEwlCYW5nYWxvcmUxFzAVBgNV\nBAkTDlN1YmJpYWggR2FyZGVuMQ8wDQYDVQQREwY1NjAwMTExFDASBgNVBAoTC0J5\ndGViZWFtLmlvMB4XDTIyMTEwMzA3NDcwMloXDTMyMTEwMzA3NDcwMlowKTEbMBkG\nA1UEChMSZXNwYnl0ZWJlYW1zZGt0ZXN0MQowCAYDVQQDEwExMIIBIjANBgkqhkiG\n9w0BAQEFAAOCAQ8AMIIBCgKCAQEAzsm8CF8fKSzWFKZeO52RJRGER4z7sYrgTb9x\noIeljE8kmhR+EW217sxUyUn+rmJSCxRz6jtspKv37POPaQilmwtriVq8L46YCrXa\nbI9manlqw0WqAfaWAlFXzM13CuXeGZKhuAK3INs15jqP0s+oWFvww8+hww540I+s\nn6j5yEUnWKSIgoYEc82cwvj0qOvaxYxjUTXgV2IDLSXdFJbZq4k9LDbzPZdDe0aY\n4X9UpdrjS5cRWT3Ok4VwWpMRwOT654CTwE8WUja/pHTRFbMYkqd1jrD2Joqtm+u9\nplTq7I9/fDnkRqPjueDQ04LKTbUC2UsRKw1VmHPndw22+mDPUwIDAQABo1YwVDAO\nBgNVHQ8BAf8EBAMCBaAwEwYDVR0lBAwwCgYIKwYBBQUHAwIwHwYDVR0jBBgwFoAU\nqX8xNsutnSC6ud46YB8Ec74sfP4wDAYDVR0RBAUwA4IBMTANBgkqhkiG9w0BAQsF\nAAOCAgEAcj5Ytt47AdmsXBsv/K7YkUvkNwV64luBMQtqmTKRDWnIQLaFzPjdpieu\n81ktFKklKw6pReWdUPSBy6hKq3zzGvSsShBSghbOAJvlPkK6jpLy5TzZdIj8ug7g\nMCzZvqdmznekSg4elGHJIYUfHD6ZUJaEkkGD1yQpxOIVCnodhN2246SXJK23itmz\nB5y1AHU5zydN7Ys0oY1l8RCc5Iz24IcQAi//2pIPe9ORks3QBBi+qY9m+emHCqgb\n48hNe5v7X+yF4VITlWs3Mfk0gSgbDQ4OwVf/8/D7o0hQ8EU5bzXNvf49Kd2mWTii\nQdQDdNLxZsdgWNwYdqrQhA0qN02yJxkhNm5GXmP75zmg0bPe4I+pNwuy+B32wFZn\nNcZrh4HZzS1cAyyyr3E59zsPjqcohaUcBpe6oUoQ8z1V7K9FR31TnFfvjg9mbDnX\nv2+PXsp0m7f4e1QfepZxUwyjemxOe/b+IEc7PckIrkPy46JaIvi9ONrTR8Y5wDir\nbGuzpmiyMFlyzK4ULh7kt7MU/jU/ulnqDU8JvAnhhxK3kgV4vv8LSYJSEYYP9i1S\nj/EPPQBANdtr4B2pcV1ig13dinq7rir6Q/pnkKrAFOfZcvOWW2BvPOC2dcnCYJpB\n1R5QJGXqna8Uh+ZwThs0K/Nd9dml1w/Rug8hx0VHoIe6AjXEepQ=\n-----END CERTIFICATE-----\n",
        "device_private_key": "-----BEGIN RSA PRIVATE KEY-----\nMIIEowIBAAKCAQEAzsm8CF8fKSzWFKZeO52RJRGER4z7sYrgTb9xoIeljE8kmhR+\nEW217sxUyUn+\nAfaWAlFXzM13CuXeGZKhuAK3INs15jqP0s+oWFvww8+hww540I+sn6j5yEUnWKSI\ngoYEc82cwvj0qOvaxYxjUTXgV2IDLSXdFJbZq4k9LDbzPZdDe0aY4X9UpdrjS5cR\nWT3Ok4VwWpMRwOT654CTwE8WUja/pHTRFbMYkqd1jrD2Joqtm+u9plTq7I9/fDnk\nRqPjueDQ04LKTbUC2UsRKw1VmHPndw22+mDPUwIDAQABAoIBAHv3A/ogzBVrA4ut\nkKA8fV6zeZFLOzfcAUuakQujReMvLsoPruPT2VUmuU1SRpNT7csmn7azmRW+4gny\nmO5meKDR382fz2DTIuKI0kByVvtNfmtBwAEdSiBpkzD7m3m1A8hg1wHw3sebolw6\njy3Zvxn5RASe3GKKsnKVLu8n5VXgyytn2I6sYOmKoLv3N9V3tziHL3Gl2AfWAd5P\nJHJdxZ50hhjzUnI0MmvUU6M9G26xagxNNibzOWv3BEuBRw5fuVpt/QoBouFhcKF7\nEdCFpiZ8LJFpux6FyLDOOAa7mj+Y6yK1qKsJbFGG8AnhPTO/bAc1m7yQcJygH9cl\nretVDcECgYEA4z+NkjqIPRiAvOsmJD6KfMeABkZc4JmART+KtrpoJmPWc2WDxu8M\ngP1eqmh/aGGORY8hcFyl+SIf5JvP13Dd/47tSK4vhyEGnnqRt+wjjuzci0rDvFdH\ntaUbjlb4kKStssQPTTmG726Zd1f32eKzBnCY8YqWdMMM1HXak20rPo8CgYEA6PN8\nYIcIrRkFzyvam8m5pCeoHylBgSNjN2j8dGC8b6SGMG6y4+rUiuxfhC/Oq7UtOvf+\njYQQgeMjB22dhcvJa6rjuuKXXpbcgNnzcemnySohUr7Nm1bXHwRfoqMAmeh3pkcL\nL+K4Mf6Gd1i2hiYd4Dd59m5/p3W+QUyKa4iaRP0CgYAf2/UZHyOijSDfW4hJZIs9\n2ypTtuGmi160Vqg33gJj/3M9UmobJcB3BQ6UjXnvRF4R2nMxsYuDVglqn32QEr7M\n6VjS67i2FSc8aKqtQmnpy8NPs/elHAdtq+wlFIRcovnHKj2K8hm8z6CsXqTc4y9+\nI6MNmgRl8kKGNs+iA5ggeQKBgBKLN25zsWQeJtE8G3XlVArWQVLhtN4z0/UYPWiC\nPt3gSfJXDZSJIAxDDsN2DsyqaoRUM4ZOagX878/qkOySsWEJxIEfAo+8EKeNMgzy\nXbHs0aRFnhZsjklgzsAim6ykzcmFxEU2lhUcvtWHUVhSdnRf1iyg1Taeb9vA3Q/8\nWtN9AoGBAN+rik+pvcdPAexngqmsUgoW8Abvv7dyBmt99KfnyRDfbt6EM68CZI90\naOlNE9P7XZyOyfQdzOlJWv8B78dwrbwMiwkhGyb6ms11GGB5J90f8oON4tMjEzdW\nKFI0T+ZOXN99GcKLHeg5GfGqHcHlEhXP9BtRyTJVz914alvOIaiY\n-----END RSA PRIVATE KEY-----\n"
    }
}
)";

Step 3. Initialize and Start Bytebeam Client

The next step is to initialize and start bytebeam client. Refer below code snippet to do so:

// Add this include to your sketch
#include <BytebeamArduino.h>

//
// By including the above header you got the access to the gloabl object named Bytebeam
// Use Bytebeam global object to perform the required operations
//

void setup() {
  // put your setup code here, to run once:

  //
  //  Your application setup stuff goes here
  //

  // Make sure you initialize the wifi and ntp before stepping ahead
  // If you want logging via Serial Monitor, consider initializing the Serial as well
  
  // setting up the device info i.e to be seen in the device shadow
  Bytebeam.status          = "Device is Up!";
  Bytebeam.softwareType    = "setup-wifi-client-ino";
  Bytebeam.softwareVersion = "1.0.0";
  Bytebeam.hardwareType    = "ESP32 Dev Module";
  Bytebeam.hardwareVersion = "rev1";
  
  // This function will initialize and start the bytebeam client
  // You can over-ride the default file system and file name options, if needed
  // eg. Bytebeam.begin(BytebeamArduino::LITTLEFS_FILE_SYSTEM,"/my_device_config.json")
  if(!Bytebeam.begin()) {
    Serial.println("Bytebeam Client Initialization Failed.");
  } else {
    Serial.println("Bytebeam Client is Initialized Successfully.");
  }

  //
  // If above call is successfull then your bytebeam client is now configured for the
  // use. You can always check for the logs in serial monitor for the status of the 
  // above call
  //

  // check if bytebeam client is connected or disconnected
  bool connectionStatus = Bytebeam.isConnected();

  if(!connectionStatus) {
    Serial.println("Bytebeam Client is Disconnected.");
  } else {
    Serial.println("Bytebeam Client is Connected.");
  }

  // Call the end method to stop and de-initialize the bytebeam client at any point of 
  // time in the code
  // Bytebeam.end();
}

void loop() {
  // put your main code here, to run repeatedly:

  //
  //  Your application regular stuff goes here
  //

  // This function will let you maintain the connection with the bytebeam cloud
  // In case the connection is lost, it will attempt to reconnect to the bytebeam cloud
  Bytebeam.loop();

  // software delay, you can customize it as per your application needs
  delay(5000);
}

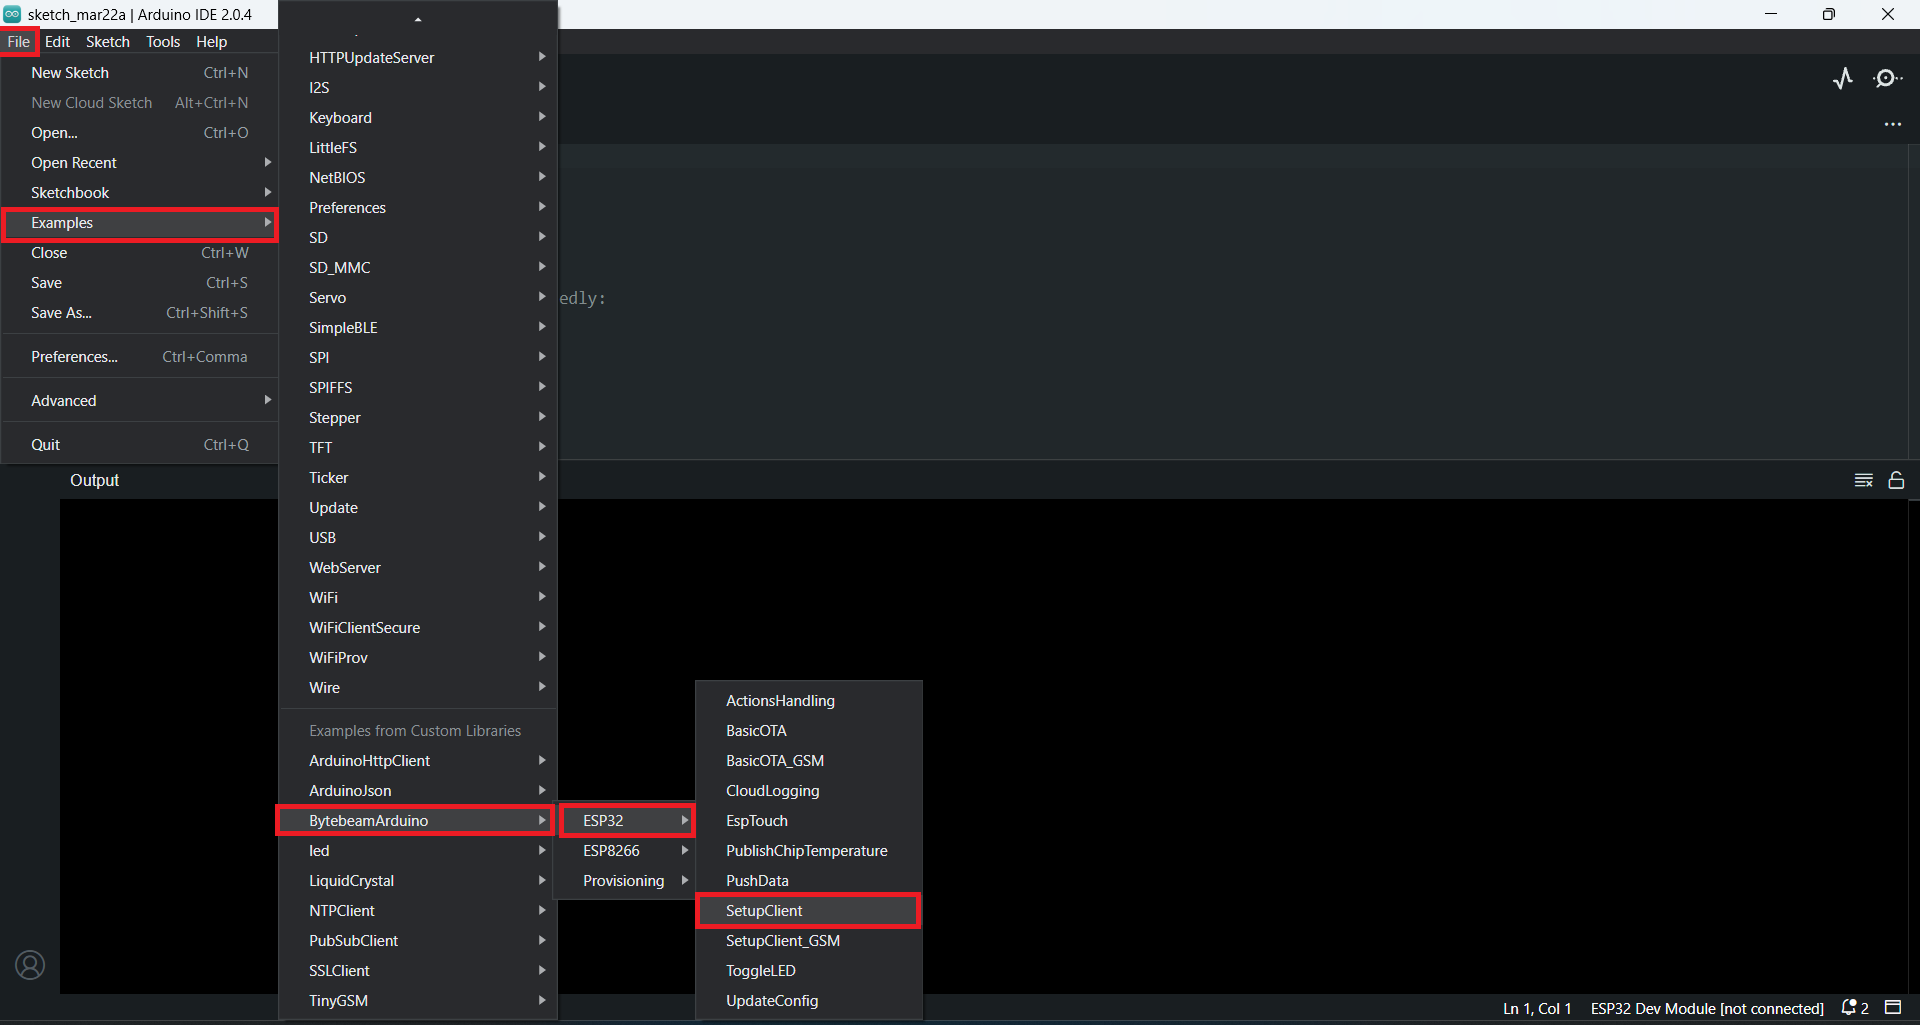
Look at the SetupClient example sketch for reference. See File > Examples > BytebeamArduino > ESP32 > SetupClient within the Arduino IDE.
Step 4. Build and Flash Application

You can build and flash your application as usual with the Arduino IDE, just setup your board configurations and hit the upload button within the Arduino IDE.